
The rainbow slide is a fun and thrilling amusement attraction that adds excitement to any outdoor & indoor space. People of all ages can enjoy such fun! Before making decision of buying this amusement equipment, you may be curious about how to install a rainbow slide carnival ride. Installing it correctly ensures safety, durability, and long-term enjoyment. Here’s a step-by-step guide on how to install this colorful carnival slide for sale, based on safety standards like ASTM F2291 and EN 1176.
Pre-installation Planning & Site Preparation for the Rainbow Slide Ride
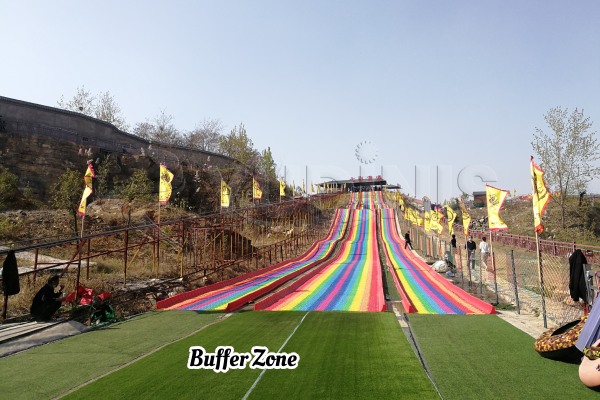
Choosing the right location is crucial for the proper installation of a rainbow slide. The ideal site should have a slope with an incline between 15° and 25°, as recommended by international safety standards. Typically, the carnival slide for sale should be between 30 to 100 meters long and 1.2 to 1.8 meters wide.
However, since every location is unique, we recommend that you share the specific details of your site with us. Based on the site’s conditions, such as the slope angle, terrain, and any potential obstacles, we will provide you with the optimal slide slope, length, and width that adhere to safety standards while ensuring the best possible experience.
Please ensure the site is free from obstacles like rocks, tree roots, or uneven surfaces, and that it is clean and level for installation.
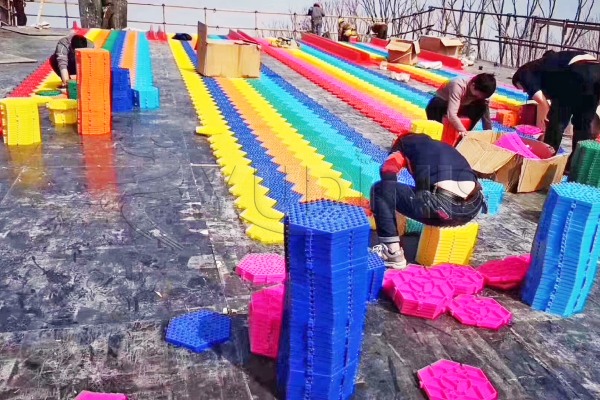
The main structure of the slide adopts a modular design, with the primary material being high-density polyethylene (PE). Special additives are incorporated, including antioxidants, low-temperature resistance, and UV protection, ensuring the slide’s durability and safety in various environmental conditions.
In addition to the carnival slide itself, the following materials are required during installation:
- Ground Stakes: Length of at least 30 cm
- Stabilizing Ropes: Used to increase the stability of the slide
- Shock-absorbing Pads: Minimum thickness of 5 cm, ensuring comfort and safety during use
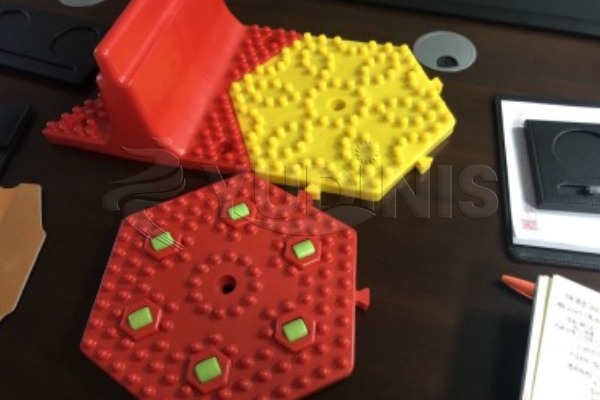
- Shape: Hexagonal
- Side Length: Customizable according to requirements
- Weight: Each block weighs approximately 380g
- Color: Available in seven colors—red, orange, yellow, green, cyan, blue, and purple—allowing for a customizable and vibrant color scheme
The rainbow slide amusement park attraction is suitable for use in temperatures ranging from -30°C to +50°C, ensuring stable performance in diverse weather conditions.
Please ensure all materials are prepared in advance to avoid delays during installation.
Step-by-step Guidance of How to Install a Rainbow Slide Carnival Ride
Foundation construction
1. Clear weeds and gravel on the site and compact the soil;
2. If it is a hard ground (such as cement), a buffer layer (such as rubber mat or sand) must be laid with a thickness of not less than 10cm;
3. Mark the anchor points according to the slide design drawing, with a spacing of ≤2 meters.
Laying and fixing the slide
1. Spread the colorful slide blocks along the slope to avoid wrinkles;
2. Use stainless steel ground nails or expansion bolts to fix the edge of the slide, nailing once every 1.5 meters;
3. The windproof rope is cross-fixed to the anchor points on both sides to enhance wind resistance (it needs to be suspended when the wind speed is >8).
Safety testing and acceptance
1. No-load test: Check whether the rainbow slide amusement attraction is flat and has no warping edges, and whether the fixing points are loose;
2. Load test: Use sandbags (weight ≥ 75kg) to simulate the sliding of passengers and observe whether the buffer area is effective;
3. Acceptance criteria: No jamming during the entire sliding process, and the end deceleration distance ≥ 3 meters.
Installing a rainbow slide amusement project is easy. But if required, DINIS carnival ride manufacturer can also dispatch engineer to your location to help with the installation!
Get Free Quote
Buy Now at a 10% Discount!